PART 1 | PART 2 | PART 3
 Despite the popularity of Tomcat, it seems to have something of a reputation for being a developer’s application server because of how apparently simple and “no-frills” it seems to be, and therefore suited only to the most lightweight of deployments. In reality, many of the features that aren’t included in Tomcat are those that most businesses will never miss (and for those that will, projects like TomEE bring together all the necessaries for a full Java EE profile).
In this blog post, I’ll go through a very common scenario for a small production environment – a single tier, load balanced application server cluster.
One of the most fundamental concepts in high availability is load balancing work across multiple server instances. The specifics of exactly how that is achieved varies a lot depending on whether you want to scale up– add more server instances to a host – or scale out– add more hosts with server instances on.
Getting Started
Early releases of Tomcat 8 have been out for a while now and although it’s still in beta at the time of writing (8.0.5), it’s still worthwhile testing it out with common tasks. When beginning any new project like this, it makes sense to do all your testing with the very latest stable version.
Nothing we will be using in this blog will make use of a new feature, so although I’m using the latest build, all steps should apply to some older Tomcat versions, certainly Tomcat 7.x
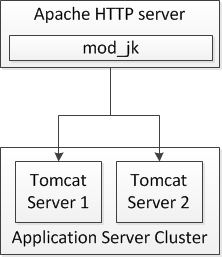
The high-level overview of what we will be doing is as follows:
- Download and install Apache HTTP server and mod_jk
- Download Tomcat
- Configure two local (on the same host) Tomcat servers
- Cluster the two Tomcat servers
- Configure Apache to use mod_jk to forward requests to Tomcat
I’ve already covered Apache and mod_jk installation, so I won’t go over that a second time although I will say that I am using Xubuntu 13.10 and installing both Apache and mod_jk from the PPA repositories. The packages I downloaded were “apache2” and “libapache2-mod-jk”. Installing these two packages means that both the web server and mod_jk are already configured, and my configuration file for mod_jk is almost exactly the same as Apache’s example and is located in /etc/apache2/mods_enabled/jk.conf.
Downloading Tomcat is as straightforward as going to tomcat.apache.org, but it’s a good idea to check the version specification matrix so you’ll know that if you want to test the implementations of the latest specifications you’ll need to download version 8.
Configuring the Servers
After Tomcat has been downloaded, you’ll need to extract the server to an appropriate location. In my case, that was /opt/tomcat/apache-tomcat-8.0.5
Since both of my servers are going to be on the same machine, I will have two server directories. To keep things simple, I just duplicated the directory and added the server name to each (/opt/tomcat/apache-tomcat-8.0.5-server1 andserver2).
Before I can start the servers, I need to edit the port numbers to avoid conflicts:
Above is the full server.xml for my “server2”. The only difference to the server.xml of server1 is the value of the port attribute in the main Server element and the port and redirectPort attributes in the Connector element. You might also note that I have removed the HTTP connector, leaving only the AJP connector. The reason for that is that I want my web apps to be only accessible through the load balancer, and that communication will be over the more performant AJP protocol. It’s perfectly fine to leave HTTP connectors there while testing.
Configuring mod_jk
mod_jk requires exactly one workers.properties file where load balancing is configured. “Workers” are defined in the properties file and represent actual or virtual workers.
If you’ve installed Apache and mod_jk from the Ubuntu package manager, like I have, because you want to get up and running and see how it all works in the quickest time possible, you will need to add this to the default virtual host in the <apache_home>/sites-enabled directory. If you are adding these directives to a virtual host, you should also add the following:
Testing it out
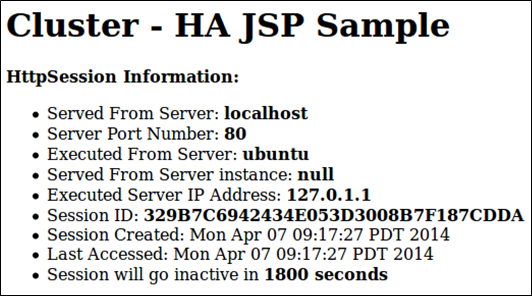
To test our setup so far, we need to deploy an appropriate webapp. I’m going to use the ClusterJSP sample application, since it’s been around in examples long enough that just googling that phrase will give a long list of places where it’s hosted! Here’s a direct link to the file hosted by JBoss but, should that link become invalid in the future, I’ve no doubt that it will be easy to find elsewhere.
Deploying to Tomcat is, like most things, very straightforward. Copy the WAR to the <server>/webapps directory and start Tomcat using the <server>/bin/startup.sh script. If you go to http://localhost/clusterjsp you should now see the page rendered properly.
The fourth bullet from the bottom shows the session ID:
![]()
![]()
If you refresh the clusterjsp page a few times, you should see the effect in the above section. The important columns are “V” and “Acc” which are showing the worker.[workername].lbvalue and worker.[workername].elected properties respectively.
What this means is that we can see an interesting effect. Making sure that clusterjsp was still loaded, I refreshed a couple of times to see the session ID change a few times. Once I restarted my sever, I refreshed the page again until I saw Tomcat append “.server1” to the session ID:
![]()
This meant that all of my requests were going to that server. Holding down F5 (a cruel thing to do to a web server, but no Tomcats were harmed in the making of this blog) meant that I was stuck to server1, but all my requests from refreshing so much bumped up the lbvalue of server1 from the JK status page I mentioned earlier.
I opened a private browsing tab, so my cookie wouldn’t be used, and went to the clusterjsp page again. The effect now is that I get routed straight to server2, which (if you’re trying this too) you’ll see because the session ID doesn’t have anything appended to it.
Refreshing the new tab will keep sending me to server2, maintaining my session because the loadbalancer is trying to bring the lbvalues back into line with each other.
Don’t expect that it’s good enough to set your jvmRoute on one server and think that sticky sessions are now working fine, though! If I’d had 3 servers, then my requests would have flip-flopped between the two other servers until all three lbvalues were equal. The other effect is that you’ll find that as soon as the lbvalues are all equal again, you’ll be sent to server1 and stuck to it again!
That sort of thing gives very unpredictable behaviour in practice so, if you need to maintain user sessions in Tomcat, make sure you set your jvmRoute!
Going Further
If you’d like to go deeper with some of the things I’ve covered, you could always try these suggestions:
Next in the series, Andy will take a look at some options for configuration and testing!
![]()
Follow @croft |![View Mike Croft's profile on LinkedIn]() | Mike Crofton
| Mike Crofton![Google+]()
Configuring the Servers
After Tomcat has been downloaded, you’ll need to extract the server to an appropriate location. In my case, that was /opt/tomcat/apache-tomcat-8.0.5
Since both of my servers are going to be on the same machine, I will have two server directories. To keep things simple, I just duplicated the directory and added the server name to each (/opt/tomcat/apache-tomcat-8.0.5-server1 andserver2).
Before I can start the servers, I need to edit the port numbers to avoid conflicts:
mike@ubuntu:~$ vim /opt/tomcat/apache-tomcat-8.0.5-server2/conf/server.xml
<Server port="9005" shutdown="SHUTDOWN">
<Listener className="org.apache.catalina.core.AprLifecycleListener" SSLEngine="on" />
<Listener className="org.apache.catalina.core.JreMemoryLeakPreventionListener" />
<Listener className="org.apache.catalina.mbeans.GlobalResourcesLifecycleListener" />
<Listener className="org.apache.catalina.core.ThreadLocalLeakPreventionListener" />
<GlobalNamingResources>
<Resource name="UserDatabase" auth="Container"
type="org.apache.catalina.UserDatabase"
description="User database that can be updated and saved"
factory="org.apache.catalina.users.MemoryUserDatabaseFactory"
pathname="conf/tomcat-users.xml" />
</GlobalNamingResources>
<Service name="Catalina">
<Connector port="9009" protocol="AJP/1.3" redirectPort="9443" />
<Engine name="Catalina" defaultHost="localhost">
<Realm className="org.apache.catalina.realm.LockOutRealm">
<Realm className="org.apache.catalina.realm.UserDatabaseRealm"
resourceName="UserDatabase"/>
</Realm>
<Host name="localhost" appBase="webapps"
unpackWARs="true" autoDeploy="true">
<Valve className="org.apache.catalina.valves.AccessLogValve" directory="logs"
prefix="localhost_access_log" suffix=".txt"
pattern="%h %l %u %t "%r" %s %b" />
</Host>
</Engine>
</Service>
</Server>
Configuring mod_jk
mod_jk requires exactly one workers.properties file where load balancing is configured. “Workers” are defined in the properties file and represent actual or virtual workers.
 worker.list=loadbalancer,status
 worker.server1.port=8009
 worker.server1.host=localhost
 worker.server1.type=ajp13

 worker.server2.port=9009
 worker.server2.host=localhost
 worker.server2.type=ajp13

 worker.server1.lbfactor=1
 worker.server2.lbfactor=1

 worker.loadbalancer.type=lb
 worker.loadbalancer.balance_workers=server1,server2

 worker.status.type=status
The above configuration defines two virtual workers, and two actual workers, which map to my Tomcat servers. The virtual workers “status” and “loadbalancer” are defined in the worker.list property, because I’m going to refer to them later in my apache configuration.
Second, I’ve defined workers for each of my servers, using the values from the AJP connectors in the server.xml from earlier. I’ve also included two optional properties for these workers, “lbfactor”. The higher the number of this property, the more preference mod_jk will give that worker when load balancing. If I had given the servers lbfactors of 1 and 3, I would find that the round-robin loadbalancing would prefer one server over the other with a 3:1 ratio.
Lastly, I’ve got a little configuration for my virtual workers. I’ve set the loadbalancer worker to have type “lb” and listed the workers which represent Tomcat in the “balance_workers” property. If I had any further servers to add, I would define them as a worker and list them in the same property. The only configuration that the status worker needs is to set the type to status.
Configuring Apache Web Server to forward requests
Possibly the easiest part of the configuration, you will need to add the following lines to your Apache configuration:
     JkMount /status status
     JkMount /* loadbalancer
If you’ve installed Apache and mod_jk from the Ubuntu package manager, like I have, because you want to get up and running and see how it all works in the quickest time possible, you will need to add this to the default virtual host in the <apache_home>/sites-enabled directory. If you are adding these directives to a virtual host, you should also add the following:
JkMountCopy On
Testing it out
To test our setup so far, we need to deploy an appropriate webapp. I’m going to use the ClusterJSP sample application, since it’s been around in examples long enough that just googling that phrase will give a long list of places where it’s hosted! Here’s a direct link to the file hosted by JBoss but, should that link become invalid in the future, I’ve no doubt that it will be easy to find elsewhere.
Deploying to Tomcat is, like most things, very straightforward. Copy the WAR to the <server>/webapps directory and start Tomcat using the <server>/bin/startup.sh script. If you go to http://localhost/clusterjsp you should now see the page rendered properly.
The fourth bullet from the bottom shows the session ID:
Going to localhost/status will bring up the mod_jk status page. With our basic configuration, the main section is dedicated to information about the load balancer workers and the two workers it is balancing:

If you refresh the clusterjsp page a few times, you should see the effect in the above section. The important columns are “V” and “Acc” which are showing the worker.[workername].lbvalue and worker.[workername].elected properties respectively.
The lbvalue (“V”) is the number that the load balancer uses to decide which server to route the next request to. Whichever has the smallest number will get the next request. It’s not a count, although it will look like one if you’ve set the lbfactor to 1 on all workers. If you increase the lbfactor on (for example) server2 to 2 in my case, then you will see that the lbvalue jumps up by two at a time on the server1 worker. This means that more requests go to server2, since its lbvalue is more frequently lower.
The number next to it is the elected value, meaning the number of requests which have gone to that server in total. You should see that, as the number of requests increases, the ratio of the elected value on server1 and server2 has roughly the same ratio as you’ve defined in the worker.properties file.
Enabling Sticky Sessions
If you’ve already read through the mod_jk documentation, you’ll have found that sticky sessions are enabled by default for load balancer workers. If that’s true then why isn’t it letting you carry on your session, rather than providing a new one?
The answer is in an attribute of the Engine element of the server.xml that we haven’t yet added: the jvmRoute. To see this in action, I added the jvmRoute attribute to only my server1 server.xml file:
<Engine name="Catalina" defaultHost="localhost" jvmRoute="server1">
What this means is that we can see an interesting effect. Making sure that clusterjsp was still loaded, I refreshed a couple of times to see the session ID change a few times. Once I restarted my sever, I refreshed the page again until I saw Tomcat append “.server1” to the session ID:

This meant that all of my requests were going to that server. Holding down F5 (a cruel thing to do to a web server, but no Tomcats were harmed in the making of this blog) meant that I was stuck to server1, but all my requests from refreshing so much bumped up the lbvalue of server1 from the JK status page I mentioned earlier.
I opened a private browsing tab, so my cookie wouldn’t be used, and went to the clusterjsp page again. The effect now is that I get routed straight to server2, which (if you’re trying this too) you’ll see because the session ID doesn’t have anything appended to it.
Refreshing the new tab will keep sending me to server2, maintaining my session because the loadbalancer is trying to bring the lbvalues back into line with each other.
Don’t expect that it’s good enough to set your jvmRoute on one server and think that sticky sessions are now working fine, though! If I’d had 3 servers, then my requests would have flip-flopped between the two other servers until all three lbvalues were equal. The other effect is that you’ll find that as soon as the lbvalues are all equal again, you’ll be sent to server1 and stuck to it again!
That sort of thing gives very unpredictable behaviour in practice so, if you need to maintain user sessions in Tomcat, make sure you set your jvmRoute!
Going Further
If you’d like to go deeper with some of the things I’ve covered, you could always try these suggestions:
- Install everything from scratch
- Don’t use any repository or installer, just unzip and configure everything yourself. You’ll get a much better idea of how things are put together and why things are done the way they are.
- Adding another server with a higher load balancer weight to see how many more requests go to that server (removing the jvmRoute to stop sticky sessions, then seeing how things change when you add it back in!)
Next in the series, Andy will take a look at some options for configuration and testing!

Follow @croft |
 | Mike Crofton