Introduction
 Monitoring tools, such as RHQ, are a useful and sometimes integral part of a software system, providing insight into the mysterious happenings of our computers and the software running on them. Their usefulness however, is limited by the products and metrics that they can monitor.
As RHQ currently stands (4.11), it cannot monitor WildFly due to a plugin error; the plugin would fail to correctly check the product name, default to JBoss AS, and refuse to monitor the app server due to the discrepancy. The kind folks who contribute to the RHQ project have implemented a fix for this in the master build available on GitHub (see here), so if you’re gnawing at the bit to monitor some WildFly and can’t wait for the next release, you’re in luck.
Building RHQ
Building RHQ from source is no more difficult than building GlassFish from source, in fact the steps are pretty much the same. I’ll be walking you through the build, but if you want, you can read the official guide.As a side note, I'm assuming that you already have Git, Maven, PostgreSQL, and JDK 7 installed, as all of these are required! If you don't have them installed, I would go install them now before attempting to continue with this guide; you'll be making it needlessly difficult for yourself otherwise!
Configuring Maven
To ensure the build is successful, you must set some environment variables for Maven; if you don’t set them, the default settings will likely cause the build to fail after about 50 minutes with an “out of memory” error, and you will have to start again (am I bitter? Slightly).The environment variables to set are:
- MAVEN_HOME=$where_you_installed_it
- MAVEN_OPTS=“-Xms256M –Xmx768M –XX:PermSize=128M –XX:MaxPermSize=256M”
- PATH=$PATH:$MAVEN_HOME/bin
Once you have downloaded this file, place it in the $HOME/.m2 directory (note: most GNU/Linux distributions hide files or directories beginning with a full-stop by default). $HOME refers to your actual home directory here (e.g. /home/user/.m2 on a Linux system), not the Maven home.
Configuring PostgreSQL
When installing the RHQ binaries, a database named rhq and a user named rhqadmin are required; building RHQ from source also requires another database be created, rhqdev. Run the following commands to create them: CREATE DATABASE rhq;
CREATE DATABASE rhqdev;
CREATE USER rhqadmin WITH PASSWORD ‘rhqadmin’;
GRANT ALL PRIVILEGES ON DATABASE rhq to rhqadmin;
GRANT ALL PRIVILEGES ON DATABASE rhqdev to rhqadmin;
Get RHQ
With the pre-configuration tasks done, we can now move on to getting and building RHQ. As previously noted, the RHQ master branch is publicly hosted on GitHub, allowing us to clone the repository to our own machines. Clone the master branch with this command: git clone https://github.com/rhq-project/rhq.git
Building and starting RHQ
Finally, we can begin building RHQ! Be warned though; as hinted at earlier, the build can take around an hour to complete, so you may want to go and eat lunch whilst Maven downloads dependencies for about 5 times as long as it takes to just download RHQ.Navigate into the rhq directory that you just downloaded, and invoke this command:
mvn -Penterprise,dev -Ddbsetup -DskipTests install
Once Maven has finished, you can find the start commands in “$where_you_downloaded_rhq/rhq/dev-container/rhq-server/bin”, and start the server as if you’d just downloaded the binaries with the “rhqctl start” command.
Setting up and Starting WildFly
Configuring RHQ to Monitor WildFly
The final steps! When you start RHQ, WildFly will not instantly be available in the inventory; we must wait for the agent to locate it and then manually add it to our inventory. To do so, click on the Inventory dropdown arrow and select Discovery Queue. From here, expand the localhost resource and check the box next to the WildFly app server before clicking Import. If the agent has not located the WildFly server yet, import the agent into your Inventory (the same way as described for WildFly), right click it, select Execute Prompt Command under Operations, and enter discovery -f. Alternatively, just restart the agent; agents perform a discovery scan when they are started. Refresh the Inventory page and WildFly should be there.With WildFly imported, click on the Servers link in the Resources pane to get a list of the servers being monitored. You should see our WildFly server here, though it will not be listed as available since we haven’t finished configuring RHQ yet. Click on WildFly to be taken to its main page, and select the Inventory tab to get a list of all the components it has. From this tab, click on Connection Settings, and you should notice that the password field is blank.
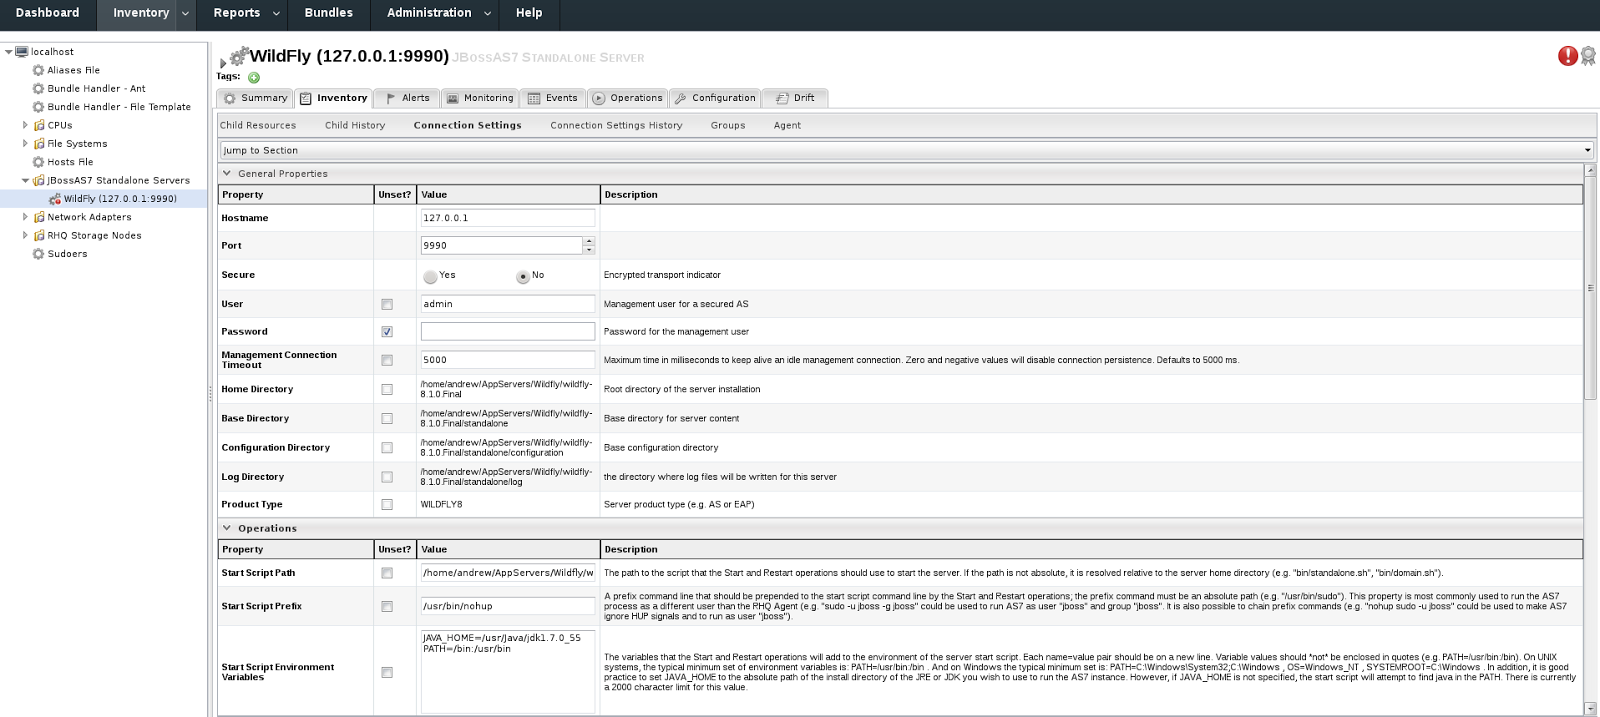
Enter the password you chose when creating the admin user for WildFly (also edit the user if it doesn’t match the one you chose), and save your changes. If the stars have aligned in your favour, RHQ should begin to monitor WildFly!
Wrapping Up
Well done! You are ahead of the trend and are monitoring WildFly with your own personally built RHQ instance (Maven gets no credit). If you’re new to RHQ, poke around the Monitoring tab to see all of the metrics being collected and configure how often they will update. If you aren’t new to RHQ, well you know what to do!Feel free to check out some of our other blog posts on WildFly and RHQ, such as our overview of the new features in WildFly 8, or how to monitor JBoss Data Grid with JON (RHQ).
